
Dienstag, 31. Januar 2012
webOS: Kind inheritance tree for Enyo 1.0
Montag, 30. Januar 2012
webOS: Implementing promises with Enyo components
I recently needed to make a few web service calls from within my Enyo application. I wanted to use the cujojs.com when.js library for synchronization with promises. Promises in itself are a very intriguing concept and I will write another blog post about them in the future.
In essence a promise works this way:
The login function of the web service sends out an request asynchronously and returns immediately. The usual way to handle this kind of behavior is to pass a set of callback functions to the login method, that are called when the service is successful or had failed. Promises allow for more compact code. See this article for a good explanation.
To make a web service call in Enyo you normally use an enyo.WebService component like this:
The WebService kind has to event methods onSuccess and onFailure. But in the definition of the kind, those two events take only strings. When the doSuccess or doFailure methods are called the intelligence of the enyo.Object handle the translation from the string to the actual method call.
To implement the promise concept with the WebService kind, we have to create our own kind.
The component creates a deferred object and resolves/rejects it based upon the result of the web service call. Use the following code to integrate the kind in your own software:
x
In essence a promise works this way:
webservice.login(username, password).then(
  function loginSuccess(response) {
    enyo.log("Login successful");
  }, function loginFailed(response) {
    enyo.log("Login failed.");
  });
The login function of the web service sends out an request asynchronously and returns immediately. The usual way to handle this kind of behavior is to pass a set of callback functions to the login method, that are called when the service is successful or had failed. Promises allow for more compact code. See this article for a good explanation.
To make a web service call in Enyo you normally use an enyo.WebService component like this:
enyo.kind({
  name : "LoginComponent",
  kind : enyo.Component,
  components : [ {
    kind : "WebService",
    name : "loginWebService",
    url : "https://<your service URL here>",
    method : "post",
    onSuccess : "loginSuccess",
    onFailure : "loginFailure"
  } ],

  loginSuccess : function(inSender, inResponse, inRequest) {
    enyo.log("Login successful.");
  },

  loginFailure : function(inSender, inResponse, inRequest) {
    enyo.log("Login failed.");
  }
});
The WebService kind has to event methods onSuccess and onFailure. But in the definition of the kind, those two events take only strings. When the doSuccess or doFailure methods are called the intelligence of the enyo.Object handle the translation from the string to the actual method call.
To implement the promise concept with the WebService kind, we have to create our own kind.
enyo.kind({
  name : "LoginWebservice",
  kind : enyo.Component,

  deferred : undefined,

  components : [ {
    kind : "WebService",
    name : "loginWebService",
    url : "https://<your service URL here>",
    method : "post",
    onSuccess : "loginSuccess",
    onFailure : "loginFailure"
  } ],

  login : function(inUsername, inPassword) {
    this.deferred = when.defer();
    var params = {
      Username : inUsername,
      Password : inPassword
    };
    this.$.loginWebService.call(params);
    return this.deferred.promise;
  },

  loginSuccess : function(inSender, inResponse, inRequest) {
    this.deferred.resolve(inResponse);
  },

  loginFailure : function(inSender, inResponse, inRequest) {
    this.deferred.reject(inResponse);
  }
});
The component creates a deferred object and resolves/rejects it based upon the result of the web service call. Use the following code to integrate the kind in your own software:
enyo.kind({
  name : "LoginWebServiceTest",
  kind : "Component",
  components : [ {
    kind : "LoginWebservice",
    name: "wsLogin"
  }, {
    kind : "Button",
    onclick: "loginTest"
  } ],

  loginTest : function(inSender) {
    this.$.wsLogin.login("Username", "MySecretPassword").then(
      function loginSuccess(response) {
        enyo.log("Login successful");
      }, function loginFailed(response) {
        enyo.log("Login failed.");
      }
    );
  }
});
x
Montag, 23. Januar 2012
webOS: Login dialog with Enyo
The Enyo framework is very modular and thus allows components to be reused very easy. Here we have a simple modal dialog that can be used to let the user enter a login name and a password.
The dialog will look like this:
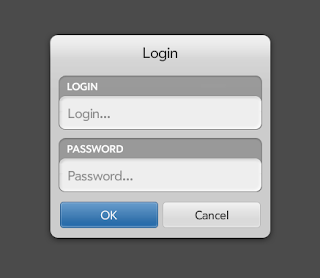
Just create a file LoginDialog.js and add it to your enyo.depends() call.
The dialog will look like this:

Just create a file LoginDialog.js and add it to your enyo.depends() call.
enyo.kind({
  kind : "ModalDialog",
  name : "FFComputing.LoginDialog",
  caption : "Login",
  events: {
    onOK: "",
    onCancel: ""
  },
  components : [ {
    kind : "Group",
    name : "LoginCaption",
    caption : "Login",
    components : [ {
      kind : "Input",
      name : "loginInput",
      hint : "Login...",
      autoWordComplete : false,
      spellCheck : false,
      autocorrect : false
    } ]
  }, {
    kind : "Group",
    name : "PasswordCaption",
    caption : "Password",
    components : [ {
      kind : "PasswordInput",
      name : "passwordInput",
      hint : "Password...",
      spellCheck : false,
      autocorrect : false
    } ]
  }, {
    layoutKind : "HFlexLayout",
    components : [ {
      kind : "Button",
      flex : 1,
      caption : "OK",
      onclick : "okClicked",
      className : "enyo-button-blue"
    }, {
      kind : "Button",
      flex : 1,
      caption : "Cancel",
      onclick : "cancelClicked"
    }]
  }, ],

  okClicked: function(sender) {
    this.close();
    this.doOK(this.$.loginInput.getValue(), this.$.passwordInput.getValue());
  },

  cancelClicked: function(sender) {
    this.close();
    this.doCancel();
  }
});
Samstag, 21. Januar 2012
webOS: Open a socket
If you use Enyo or Mojo for your webOS application development, you cannot connect to a server that runs anything else than a http protocol. This limitation comes from webOS programs effectively running inside a web browser. Therefore they can make only http requests using XmlHttpRequest calls.
But webOS Version 2.X introduced support for node.js. Programs can use this library to open a socket to any server using any protocol. The downside is, that you have to do a little bit of work to get this thing moving: you have to write your own javascript service.
This code opens a connection to port 28820 on host 172.20.1.65 and sends the string "HELLO" with a line break. When it receives an response, it is written to the console.
The code is pretty simple but does not contain the framework needed to integrate it into a service. That is fodder for another post soon. Meanwhile take a look at the SDK documentation for writing javascript services.
Older versions of webOS only support node.js 0.2.3. Version 3.0.4 of webOS made an update to node.js 0.4.12 (see release notes). Be aware of that fact when using the node.js functions.
See the node.js (version 0.2.3) documentation for what you can do with the connection.
But webOS Version 2.X introduced support for node.js. Programs can use this library to open a socket to any server using any protocol. The downside is, that you have to do a little bit of work to get this thing moving: you have to write your own javascript service.
This code opens a connection to port 28820 on host 172.20.1.65 and sends the string "HELLO" with a line break. When it receives an response, it is written to the console.
// import node.js net library
var net = IMPORTS.require('net');

// constructor for service assistant
var socketAssistant = function() {
};

// function is called by framework to execute the service
socketAssistant.prototype.run = function(future) {
    // future contains the result of the function call
    // use it to transfer information to your program
    future.result = {
        reply : "Hello " + this.controller.args.name + "!"
    };

    // check if the node.js net library has been loaded
    if (!net) {
        console.error("net == NULL");
    }

    // create a new client connection
    var client = net.createConnection(28820, '172.20.1.65');

    // event handler when data arrives from the server
    client.on("data", function(data) {
        console.error("Received data: " + data.toString());
    });

    // event handler called after a connection has been established
    client.on("connect", function() {
        console.error("Connection established !");
        client.write("HELLO\n"));
    });

    // event handler called in case of an error
    client.on('end', function() {
        console.error("Connection killed.");
    });
};
The code is pretty simple but does not contain the framework needed to integrate it into a service. That is fodder for another post soon. Meanwhile take a look at the SDK documentation for writing javascript services.
Older versions of webOS only support node.js 0.2.3. Version 3.0.4 of webOS made an update to node.js 0.4.12 (see release notes). Be aware of that fact when using the node.js functions.
See the node.js (version 0.2.3) documentation for what you can do with the connection.
Freitag, 20. Januar 2012
ANT: Replace string tokens
You can use ANT to copy files during the build process. In addition to that you can modify these files on the fly and change their content. This allows you to replace tokens in the original file.
I used this mechanism in my post yesterday to generate a configuration file for my webOS application. The original file contained the structure and a few tokens, such as the vendor name or application id. During the build the original file is copied into the source folder with the replaced tokens. Very convenient!
This is my package target. It copies the file appinfo.json.in from the base directory of my project into the src directory and replaces the tokens
The file appinfo.json.in contains the following JSON string. See the webOS SDK for the description of the fields.
The ANT script uses a filter chain to modify the source file, while it is being processed. A filter chain consists of one or more filter readers. One such filter reader is replacetokens. It replaces a token in the form of "@key@" with the specified value.
I used this mechanism in my post yesterday to generate a configuration file for my webOS application. The original file contained the structure and a few tokens, such as the vendor name or application id. During the build the original file is copied into the source folder with the replaced tokens. Very convenient!
This is my package target. It copies the file appinfo.json.in from the base directory of my project into the src directory and replaces the tokens
- id
- version
- title
- vendor
<property name="appinfo.id" value="codebrocken.test" />
  <property name="appinfo.version" value="1.0.0" />
  <property name="appinfo.title" value="TestProject" />
  <property name="appinfo.vendor" value="CodeBrocken" />

  <!-- =================================

    target: package

    ================================= -->

  <target name="package" depends="depends" description="Package the application.">
    <copy file="appinfo.json.in" tofile="src/appinfo.json">
      <filterchain>
        <replacetokens>
          <token key="id" value="${appinfo.id}" />
          <token key="version" value="${appinfo.version}" />
          <token key="title" value="${appinfo.title}" />
          <token key="vendor" value="${appinfo.vendor}" />
        </replacetokens>
      </filterchain>
    </copy>

    <exec executable="cmd">
      <arg value="/c" />
      <arg value="palm-package" />
      <arg value="src" />
      <arg value="-o" />
      <arg value="bin" />
    </exec>
  </target>
The file appinfo.json.in contains the following JSON string. See the webOS SDK for the description of the fields.
{
  "id": "@id@",
  "version": "@version@",
  "vendor": "@vendor@",
  "type": "web",
  "main": "index.html",
  "title": "@title@",
  "uiRevision": "2",
  "icon": "images/icon.png"
}
The ANT script uses a filter chain to modify the source file, while it is being processed. A filter chain consists of one or more filter readers. One such filter reader is replacetokens. It replaces a token in the form of "@key@" with the specified value.
Donnerstag, 19. Januar 2012
webOS: Using ANT
I like ANT. I like the ANT integration in Eclipse. I like having all the targets of my project visible in a neat tree and just having to click on one to execute them.
Developing webOS applications is done using a few batch scripts that are provided by the SDK. You can find the scripts in the bin folder of your SDK installation directory. Newer versions of the SDK add this directory to your path (at least on Windows, haven't tried it on other platforms for some time), so you can just open a console and type the command to build your application.
So I came up with the idea of an ANT build script for the webOS batch files. Nothing fancy just a few targets, so I don't have to leave Eclipse in order to build my application.
<?xml version="1.0" encoding="UTF-8"?>
<project name="TestProject" default="all">
  <description>
    ANT project for HP Touchpad development
  </description>
  <property name="appinfo.id" value="codebrocken.test" />
  <property name="appinfo.version" value="1.0.0" />
  <property name="appinfo.title" value="TestProject" />
  <property name="appinfo.vendor" value="CodeBrocken" />

  <!-- =================================

    target: all

    ================================= -->

  <target name="all" depends="depends" description="Build the project.">
  </target>

  <!-- - - - - - - - - - - - - - - - - -

    target: depends

    - - - - - - - - - - - - - - - - - -->

  <target name="depends">
  </target>

  <!-- =================================

    target: package

    ================================= -->

  <target name="package" depends="depends" description="Package the application.">
    <copy file="appinfo.json.in" tofile="src/appinfo.json">
      <filterchain>
        <replacetokens>
          <token key="id" value="${appinfo.id}" />
          <token key="version" value="${appinfo.version}" />
          <token key="title" value="${appinfo.title}" />
          <token key="vendor" value="${appinfo.vendor}" />
        </replacetokens>
      </filterchain>
    </copy>

    <exec executable="cmd">
      <arg value="/c" />
      <arg value="palm-package" />
      <arg value="src" />
      <arg value="-o" />
      <arg value="bin" />
    </exec>
  </target>

  <!-- =================================

    target: deploy

    ================================= -->

  <target name="deploy" depends="package" description="Deploy to device.">
    <exec executable="cmd">
      <arg value="/c" />
      <arg value="palm-install" />
      <arg value="bin/${appinfo.id}_${appinfo.version}_all.ipk" />
    </exec>
  </target>

  <!-- =================================

    target: launch

    ================================= -->

  <target name="launch" depends="deploy" description="Launch the application on the device.">
    <exec executable="cmd">
      <arg value="/c" />
      <arg value="palm-launch" />
      <arg value="${appinfo.id}" />
    </exec>
  </target>

  <!-- =================================

    target: log

    ================================= -->

  <target name="log" depends="depends" description="Start logging for the application on the device.">
    <exec executable="cmd">
      <arg value="/c" />
      <arg value="palm-log" />
      <arg value="-f" />
      <arg value="${appinfo.id}" />
    </exec>
  </target>

  <!-- =================================

    target: emulator

    ================================= -->

  <target name="emulator" depends="depends" description="Start the emulator">
    <exec executable="cmd">
      <arg value="/c" />
      <arg value="palm-emulator" />
    </exec>
  </target>
</project>
The interesting targets of the build file are:
- emulator - start the emulator
- log - start live logging for your application on the device
- launch - package, install and launch your application on the device
The package target uses string token replacement to modify the template for my appinfo.json file. This way I do not have to touch the file and can reuse it in my next application. See my post about the string token replacement.
Abonnieren
Posts (Atom)